The Morbit Studio MS Teams module requires access to your Microsoft 365 (M365) tenant. In order to do this, you will need to register an application in Microsoft Entra (the new name for Azure AD) with access to the Microsoft Graph API and relevant permission roles.
The Morbit Studio MS Teams module requires access to your Microsoft 365 (M365) tenant. To do this, you will need to register an application in Entra with access to the Microsoft Graph API and relevant permission roles.
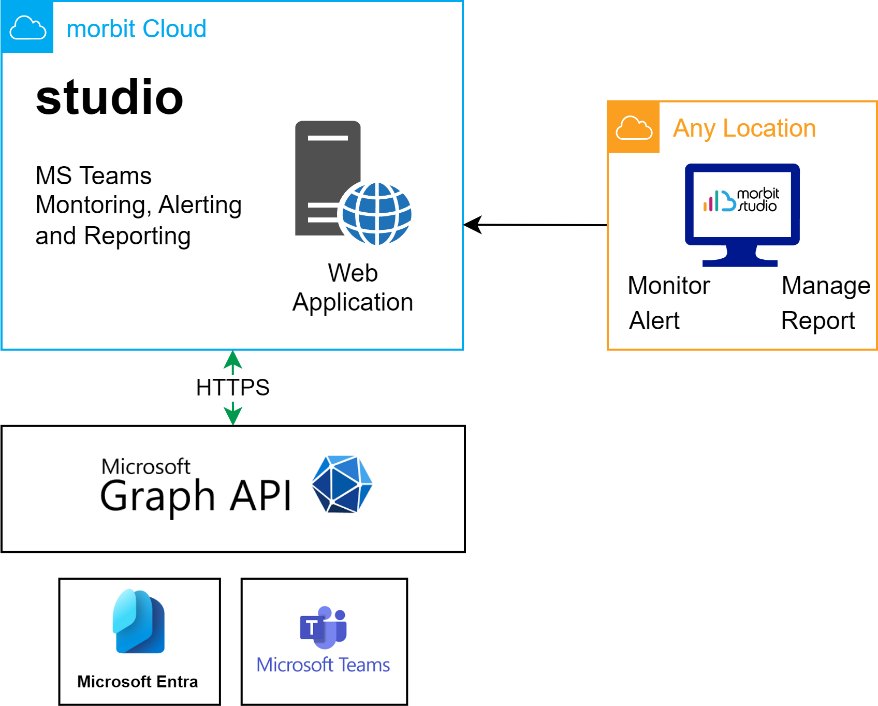
Users of the MS Teams module are not required to deploy any morbit software on their local network. Our access into the service is via the Microsoft Graph API. This is diagrammed below:
Register an app to use the Microsoft Graph API
For further information on why we need certain API permissions, please read this document.
To register an app to use Microsoft Graph API, sign in to the Microsoft Entra Admin Center using administrative credentials.
As appropriate, you may use:
- The tenant admin account.
- A tenant user account with the Users can register applications setting enabled.
- Select Identity > Applications > App registrations
- Either choose New registration to create a new application or choose an existing application. (If you choose an existing application, skip the next step.)
- In the Register an application pane, specify the following:
- Name for the application: morbit
- Supported account type: Accounts in this organizational directory only
- Click Register to create the app.
- From the Overview pane:
- Copy/take a note of the Application (client) ID value (to be used later)
- Copy/take a note of the Directory (tenant) ID value (to be used later)
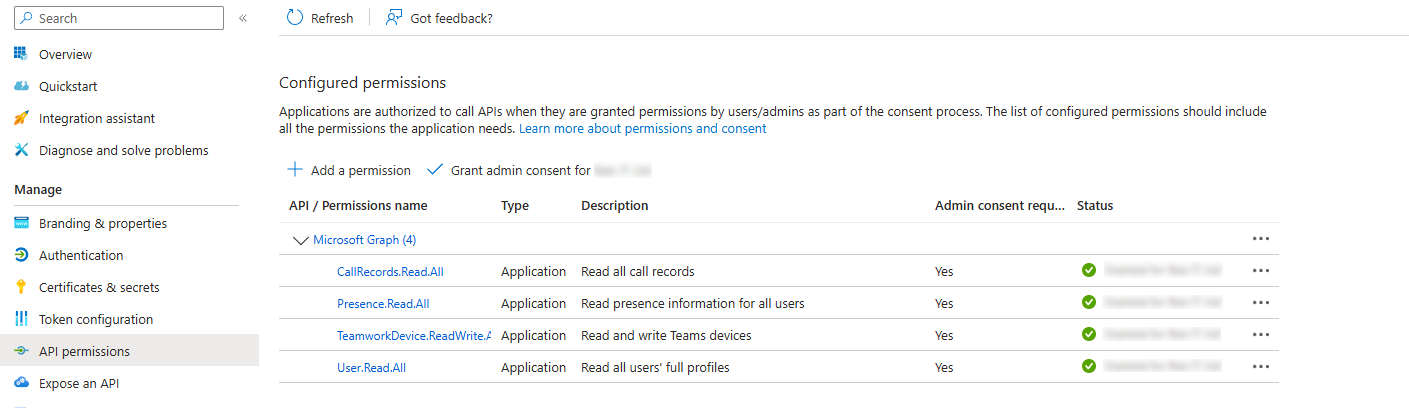
- Select API permissions.
- From the API permissions pane, choose Add a permission > Microsoft APIs > Microsoft Graph.
- Assign the following rights for Type: Application
- If you are a Smart Building User, make sure to add the correct permissions depending on Wallboard only or Wallboards and Door Panel requirements
| API / Permission name | Type | Description | Admin Consent Required? |
|---|---|---|---|
| Presence.Read.All | Application | Read presence information of all users in your organization | Yes |
| TeamworkDevice.ReadWrite.All | Application | Read and write Teams devices | Yes |
| Device.Read.All | Application | Allows the app to read your organization's devices' configuration information | Yes |
| DeviceManagementManagedDevices.Read.All | Application | Allows the app to read your organization's devices' configuration information | Yes |
| DeviceManagementManagedDevices.PrivilegedOperations.All | Application | Perform remote actions on Microsoft Intune devices | Yes |
| CallRecords.Read.All | Application | Read all call records | Yes |
| User.Read.All | Application | Read all users' full profiles | Yes |
| Place.Read.All (optional - only required for Smart Buildings feature) | Application | Read all company places (meeting rooms) | Yes |
| Calendars.ReadBasic.All (optional - only required for Smart Buildings Wallboards only feature) - OR BELOW - | Application | Read basic details of calendars in all Room Resource mailboxes | Yes |
| Calendars.ReadWrite (optional - only required for Smart Buildings Wallboards and Door Panel feature) | Application | Create and Read events of calendars in all Room Resource mailboxes | Yes |
- When finished, choose Add permissions to save your changes.
- Click the Grant admin consent for <your tenant name> button and confirm.
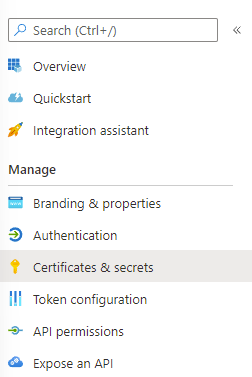
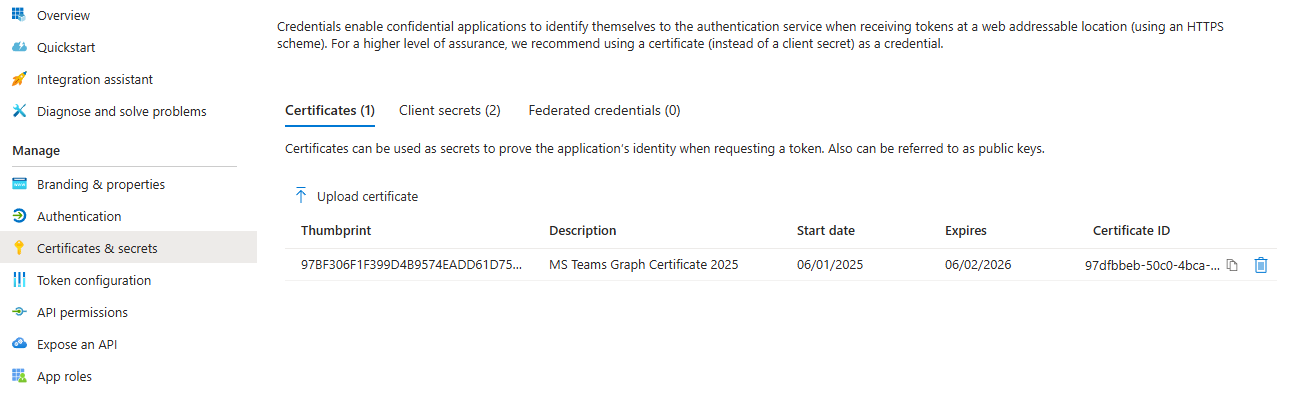
- Select Certificates & secrets from the left pane:
- Select the Certificates tab, then download the public certificate from this link: certificate
- Click the Upload Certificate button, and select the certificate downloaded in the last step.
- Load up morbit studio (https://studio.morbit.co.uk) and go to the Configuration page (via System).
- Navigate to the Organisation you are setting this up for. In the Microsoft Teams Accounts section, click
 .
. - Complete the form with the details requested:
- Description: i.e. the name of the M365 tenant
- Tenant ID: this is the Directory (tenant) ID value in the application Summary page from step 5 above
- Tenant: the MS Teams domain of the tenant
- Client ID: this is the Application (client) ID value in the application Summary page from step 5 above
- Authentication Type: Certificate
- Certificate: select the certificate MS Teams Graph Certificate 2026

The tenant is now added into morbit studio. This process must be repeated for each new tenant being added.
Discovery
Once the tenant is added, you will be required to set the scope of the deployment. Open the tenant you’ve just created, add select the Discovery menu. This section will restrict the data uploaded to our service.
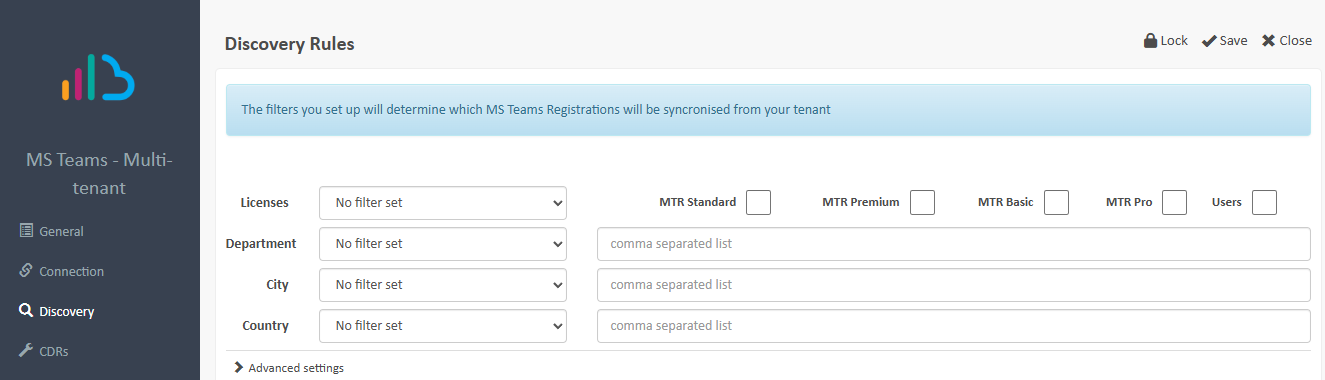
If you want all the MS Teams users and devices to be managed and viewable on the platform, just click Save. Otherwise, you can easily restrict the data received into morbit studio.
Examples:
- Where you only want MTR Pro and MTR Basic licensed registrations only displayed, For example, not Users:
- Set Licenses: Equals one of the following
- Select boxes: MTR Pro, MTR Basic
- Where you only want the ‘Operations’ department registrations displayed.
- Set Department1 : Equals one of the following
- Set value: Operations
- Where you only want the London office registrations displayed.
- Set City1 : Equals one of the following
- Set value: London
- Where you only want registrations in the UK to be displayed.
- Set Country1 : Equals one of the following
- Set value: UK
1 These values are based on the fields of the same name in Microsoft 365 Admin Center > Users > Active users > click the User Profile > Manage contact information. Depending on customer configuration, this might need changing in their own on-premise Active Directory, rather than in Microsoft 365.
Advanced Settings
Should a tenant need further refining than the current fields allow – such as a proof-of-concept deployment for a limited numbers of trialists - then you can expand the Advanced Settings section. We have picked two Active Directory fields that are unlikely to contain any existing values:
- Employee Type
- Fax Number
Utilising either one of these fields, you can assign an Active Directory value to the necessary MS Teams accounts, as an example, “morbit” in the Employee Type field. Using the same method as selecting a Department, City or Country, set the Employee Type field to Equals one of the following and the value to: morbit. Click Save. Pairing up these values in Active Directory and Morbit Studio as the same will ensure that only Registrations (Users) with the Employee Type of ‘morbit’ will appear in our system. Everything else will be ignored.
This method can be used in the same manner for the Fax Number field – it is a free text field and not restricted to numbers only.
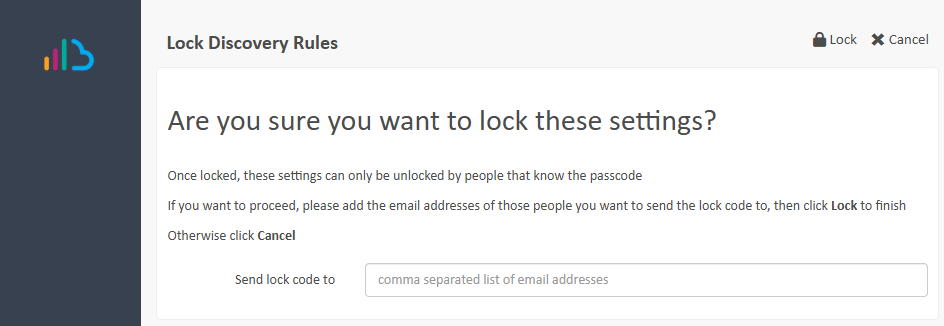
Locking Discovery Settings
Should you want to ensure that nobody can change your Discovery settings, you can PIN code protect the settings to lock them from being changed. When enabled, the Discovery settings will only unlock when a unique 4-digit PIN code is applied.
To enable this feature, click the Lock button in the top-right of the menu. Add the email addresses of the persons who will be sent an unlock PIN code and click the Lock button again.
To Unlock the settings to be able to make changes, click the Unlock button and add the PIN code to complete the unlocking process.
![]() Once the discovery section is completed, it may take 10 minutes to a couple of hours for data to populate into the platform. This is to be expected and varies depending on the size of the tenant.
Once the discovery section is completed, it may take 10 minutes to a couple of hours for data to populate into the platform. This is to be expected and varies depending on the size of the tenant.
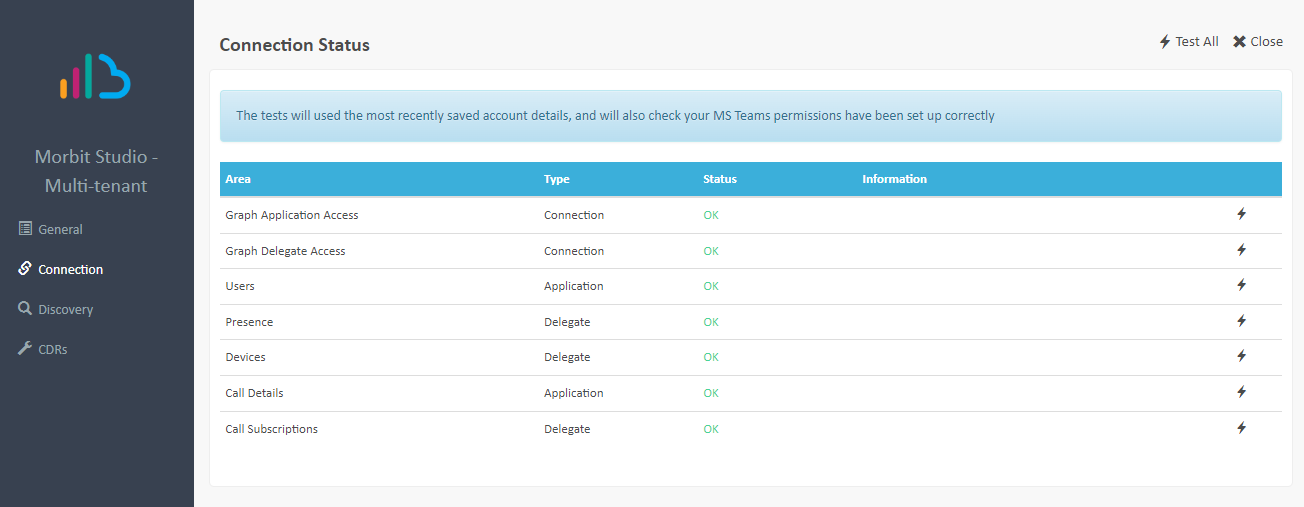
Connection Tests
Included is the ability to validate your application settings from the section, Register an app to use the Microsoft Graph API. Click the Connection menu and select the option to Test All. A successful test will return all items with the value OK in the Status column (Call Subscriptions can take up to 15 minutes to be OK, this is normal and will resolve itself).
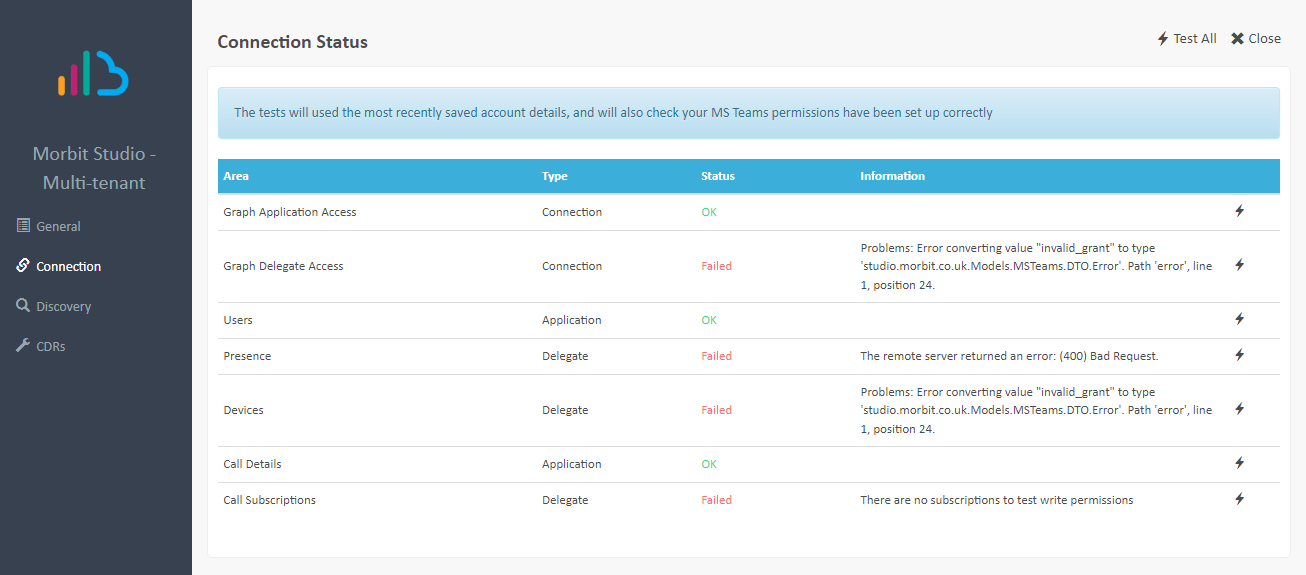
Should you get any errors like below, return to sections Pre-requisites for setup and Register an app to use the Microsoft Graph API and validate your settings. Once done, return to this section and Test All again.
CDRs
Occasionally, call data that is received from Microsoft might not contain any data due to a MS Teams issue. If that occurs, we will show any errors in the CDRs menu. This should be checked first when expected call information is missing.
Suggested next articles: Configure Call Anonymisation or Create and Configure a Network for adding other non-Teams devices or the Remote Connections feature.
Was this article helpful?
That’s Great!
Thank you for your feedback
Sorry! We couldn't be helpful
Thank you for your feedback
Feedback sent
We appreciate your effort and will try to fix the article