The Morbit partner portal is where you give your customers access to the demo site, and - if white-labelling is switched on for you - put your own brand, web address and email sender on it. This guide covers everything a partner user or partner admin can do.
- Sign in at https://maia.morbit.co.uk with your own work account.
- Demo Users - create and manage demo sign-ins for your customers. Every partner user can do this.
- White-label, Users and Notifications - for partner admins.
- You only ever see your own organisation's records.
- This guide is also in the portal, under Help.
Contents
- Getting started
- Who can do what
- Demo Users
- White-label: your brand on the demo
- Users: who in your team can sign in
- Notifications
- What your customers see
- If something does not work
- Getting help
Getting started
What Morbit sets up for you
Morbit creates your organisation in the portal and names your first admin. That person receives a welcome email with two things in it: an approval link, and the address of the portal.
One-off approval by your IT administrator
The portal uses your own Microsoft work accounts (Microsoft Entra ID), so nobody needs a new password. Before the first sign-in, an administrator of your Microsoft 365 tenant opens the approval link in the welcome email and accepts. This is done once for your whole organisation.
The portal asks only to sign people in and read their basic profile (name and email address). It cannot read mail, files or anything else in your tenant.
Signing in
- Go to https://maia.morbit.co.uk.
- Choose Sign in with Microsoft and use your work account.
- Complete multi-factor authentication when asked.
Three things must be true for the sign-in to be accepted:
- Your account belongs to your organisation's Microsoft 365 tenant.
- You have been added to your organisation's user list in the portal (see Users). Belonging to the organisation is not enough on its own.
- You signed in with multi-factor authentication. A sign-in with a password alone is refused.
Who can do what
| Page | What it is for | User | Admin |
|---|---|---|---|
| Demo Users | Demo sign-ins for your customers | Yes | Yes |
| White-label | Your names, logos, demo address and email sender. Shown only if Morbit has switched white-labelling on for you | - | Yes |
| Users | Who in your team can sign in | - | Yes |
| Notifications | Who is emailed about new and expiring demo accounts | - | Yes |
| Help | This guide | Yes | Yes |
Demo Users
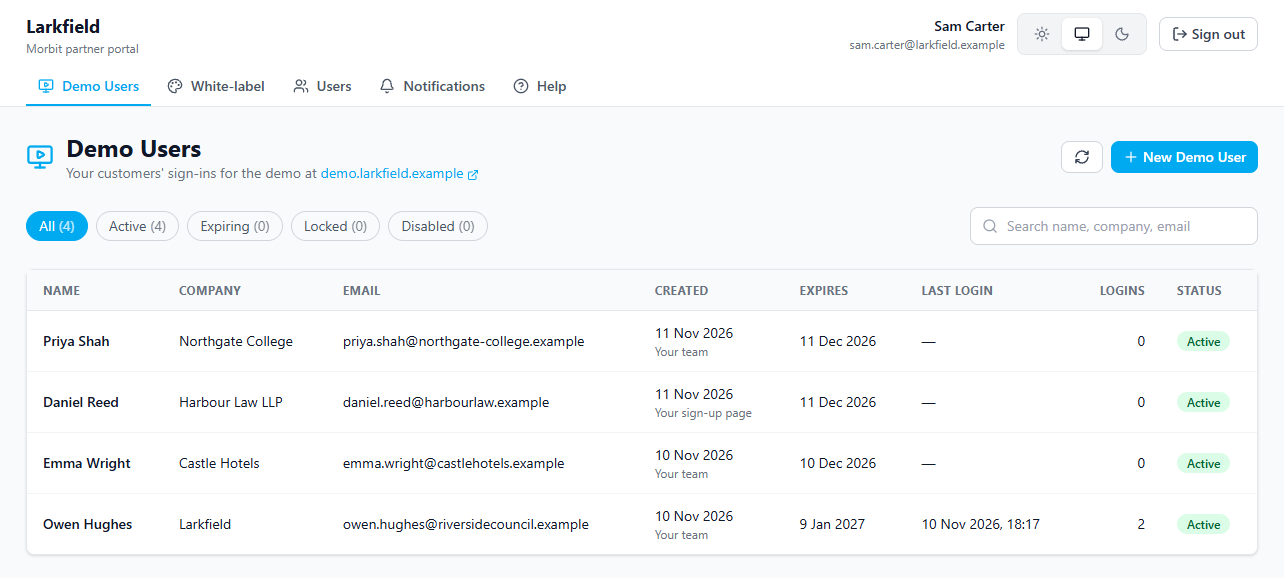
The demo site is a demonstration copy of the platform, filled with sample data, that your customers can explore in their own time. Each customer needs a demo account. The Demo Users page lists every account your organisation has created, and the line under the page title shows the address your customers sign in at.
Create an account for a customer
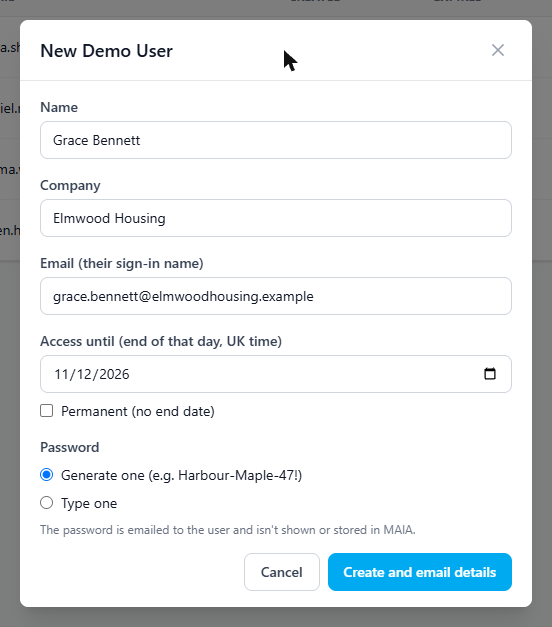
- Select New Demo User.
- Enter the person's name, company and email. The email address is their sign-in name.
- Choose the password: Generate one (recommended) or Type one. A typed password needs at least 10 characters, with a letter, a digit and a symbol.
- Set Access until - the last day they can sign in - or tick Permanent (no end date). Thirty days is the default.
- Select Create and email details.
The customer is emailed their sign-in details straight away. The password goes only to them: it is not shown to you afterwards and is not stored in a readable form, so if they lose it, reset it rather than looking it up.
What the statuses mean
| Active | The person can sign in. |
| Expiring | Access ends within the next few days. The person is emailed a reminder five days before the end date. |
| Locked | Too many wrong passwords. Five wrong attempts lock the account for 15 minutes, and longer each time it happens again. It unlocks by itself, or at once when you reset the password. |
| Disabled | The person cannot sign in, either because the end date has passed or because someone disabled the account. The account and its history are kept. |
Manage an account
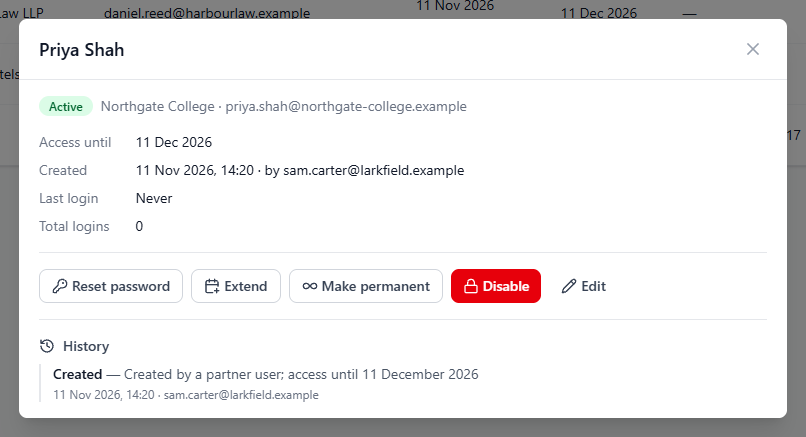
Select an account in the list to open it. From there you can:
| Action | What happens |
|---|---|
| Reset password | Emails the person a new password, ends any demo session they have open and clears a lockout. |
| Extend | Sets a new end date and emails it to the person. If the account had been disabled because it expired, extending it switches it back on. |
| Make permanent | Removes the end date and tells the person their access no longer ends. |
| Disable | Signs the person out of the demo within a few minutes and stops further sign-ins. You can add a reason, which is kept in the history. The person is not emailed. |
| Re-enable | Switches a disabled account back on. If its end date has passed you are asked for a new one. |
You can also correct the person's name and company. The email address cannot be changed; create a new account instead.
History
Each account keeps a history of everything that has happened to it: who created it, every email sent, password resets, lockouts, date changes and expiry. If an email to the person could not be sent, the account says so at the top and the history gives the reason.
Where accounts come from
Under each creation date the list shows the source:
- Your team - created by one of your users in the portal.
- Your sign-up page - the customer requested access themselves on your white-label sign-up page (see Your sign-up page).
- Morbit - created for you by Morbit staff.
White-label: your brand on the demo
For partner admins. The page appears only when Morbit has switched white-labelling on for your organisation - ask your Morbit contact if you expect it and cannot see it.
White-labelling puts your brand on the demo site, on its sign-up page and on the emails your customers receive, at your own web address. Your customers see your names and logos, not Morbit's.
The page has four steps. Steps 1 to 3 are needed; step 4 is optional.
Step 1 - Names
These replace Morbit's names wherever your customers would see them.
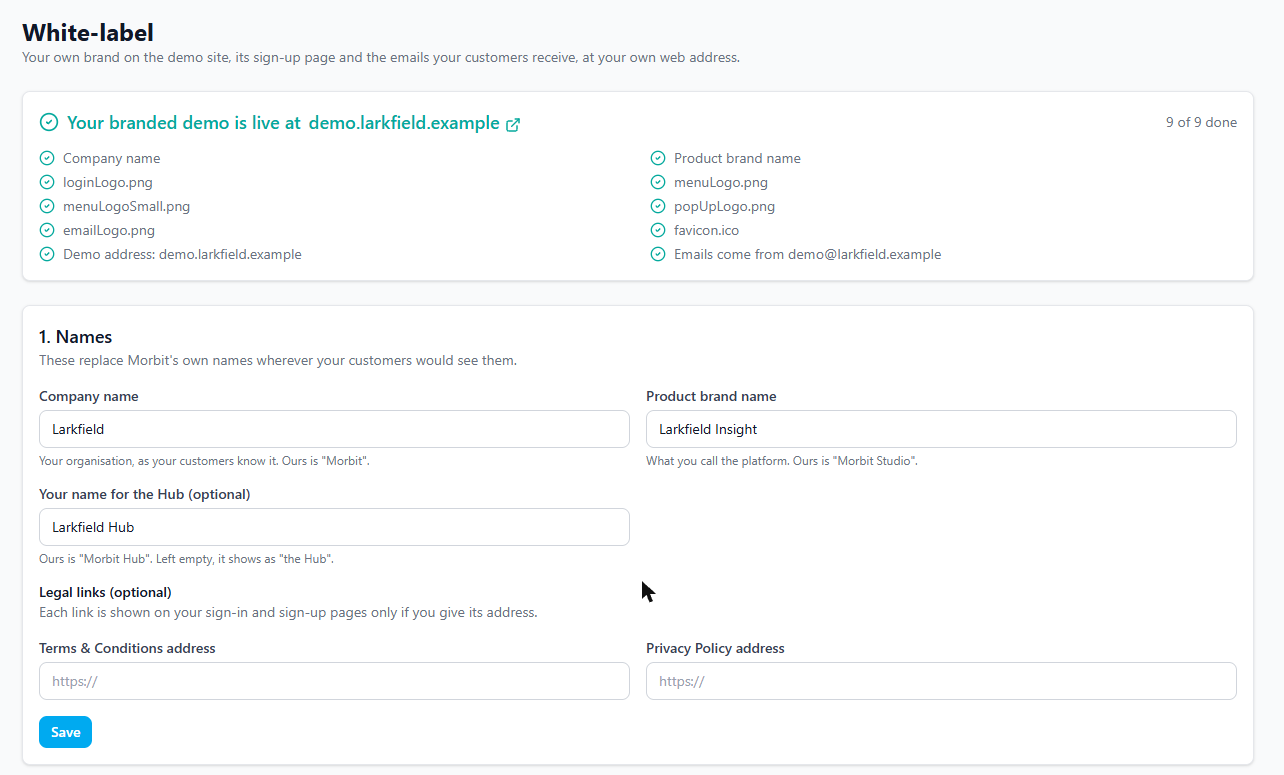
| Company name (needed) | Your organisation, as your customers know it. |
| Product name (needed) | What you call the platform. |
| Your name for the Hub (optional) | Left empty, it is shown as "the Hub". |
| Legal links (optional) | The addresses of your own privacy policy and terms and conditions. Each must start with https://. A link is shown on your sign-in and sign-up pages only if you give its address. |
Step 2 - Logos
Six files, each at an exact size. The size is checked to the pixel when you upload, and a file of any other size is refused. Each file can be up to 1 MB. If you already have a white-label site with Morbit, these are the same files.
| File | Size (pixels) | Background | Where it is used |
|---|---|---|---|
loginLogo.png | 800 x 133 | White | Demo sign-in page and sign-up page |
menuLogo.png | 800 x 133 | Transparent | Demo menu |
menuLogoSmall.png | 265 x 265 | Transparent | Demo menu when collapsed |
popUpLogo.png | 600 x 600 | White | Demo pop-ups |
emailLogo.png | 800 x 133 | Transparent | Emails to your customers |
favicon.ico | Standard icon file | Transparent | Browser tab |
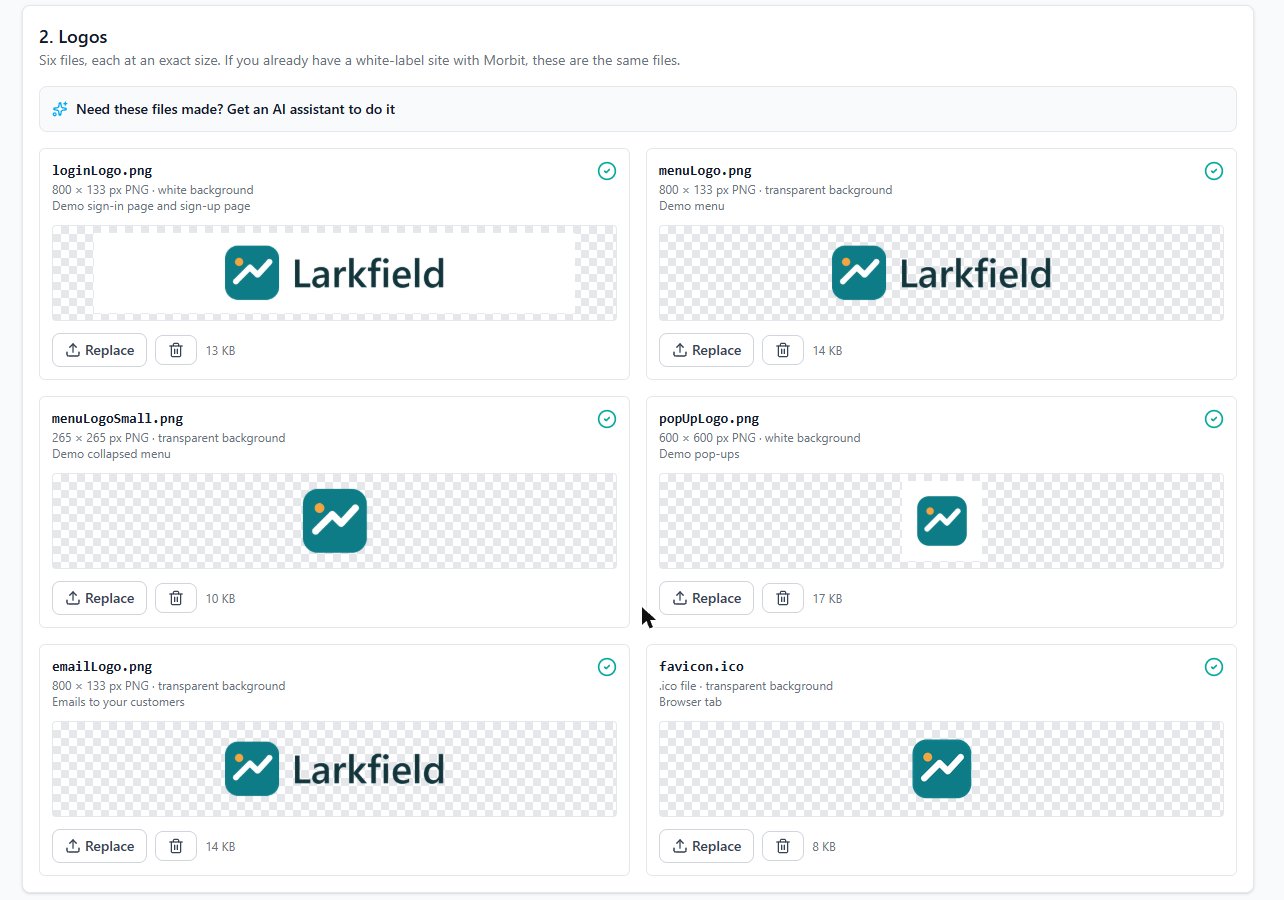
- On the Logos step, open Need these files made? Get an AI assistant to do it.
- Select Copy instruction. The instruction already contains your company name and the six exact sizes.
- Open an AI assistant that can work with image files, such as ChatGPT or Claude.
- Attach your logo - an SVG if you have one, otherwise the largest PNG you have - paste the instruction and send it.
- Upload the six files it gives you. A wrong size is caught straight away, so you can ask the assistant to correct that file.
Step 3 - Demo address
Your own web address for the demo, such as demo.yourcompany.com. Use a sub-domain of a domain you control. You need steps 1 and 2 finished first, and someone who can add DNS records for that domain.
- Type the address and select Set address.
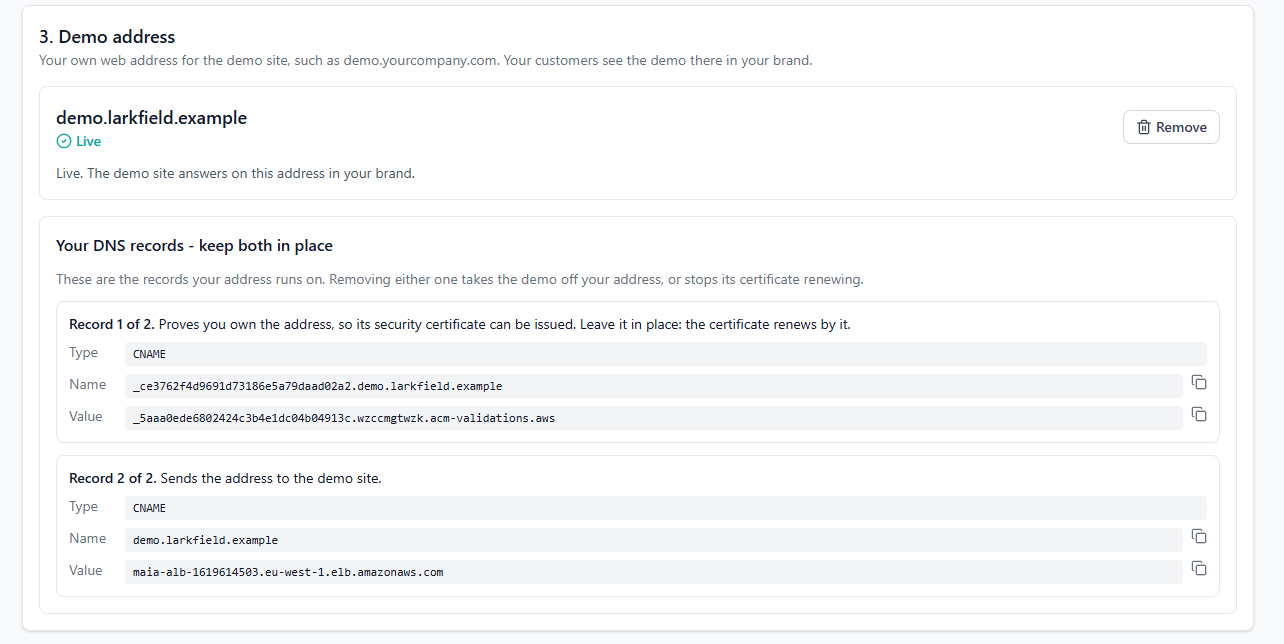
- After a few seconds the page shows two DNS records, both of type CNAME. They always appear together. Use the copy buttons so nothing is mistyped.
- Record 1 of 2 proves you own the address, so its security certificate can be issued.
- Record 2 of 2 sends the address to the demo site.
- Add both records at whoever hosts DNS for your domain.
- Wait. The certificate is usually issued within half an hour of both records being in place. The page checks by itself every couple of minutes, or you can select Check now.
- When the status changes to Live, the demo answers on your address in your brand.
- Keep both records in place for good. The first is used again each time the certificate renews; removing either one takes the demo off your address.
- A request that is not completed within 72 hours has to be started again.
- If your DNS provider offers a "proxy" option (Cloudflare's orange cloud, for example), leave it off for these two records.
- The address can be changed up to five times in 24 hours.
Removing the address
Remove stops the demo answering on your address straight away and deletes its certificate. Your customers cannot sign in until an address is live again. Delete both DNS records afterwards as well - while the address still points at the demo, visitors get a browser security warning that is not in your brand.
If you set the same address up again later, you are given the same two records.
Step 4 - Email sender (optional)
Emails to your customers always carry your logo and names. This step also makes them come from your own address, for example demo@yourcompany.com, shown as your company name. Without it they are sent from maia@morbit.co.uk - in your brand, but from a Morbit address.
- Type the address to send from and select Set sender. The mailbox does not have to exist: replies go to your notification addresses.
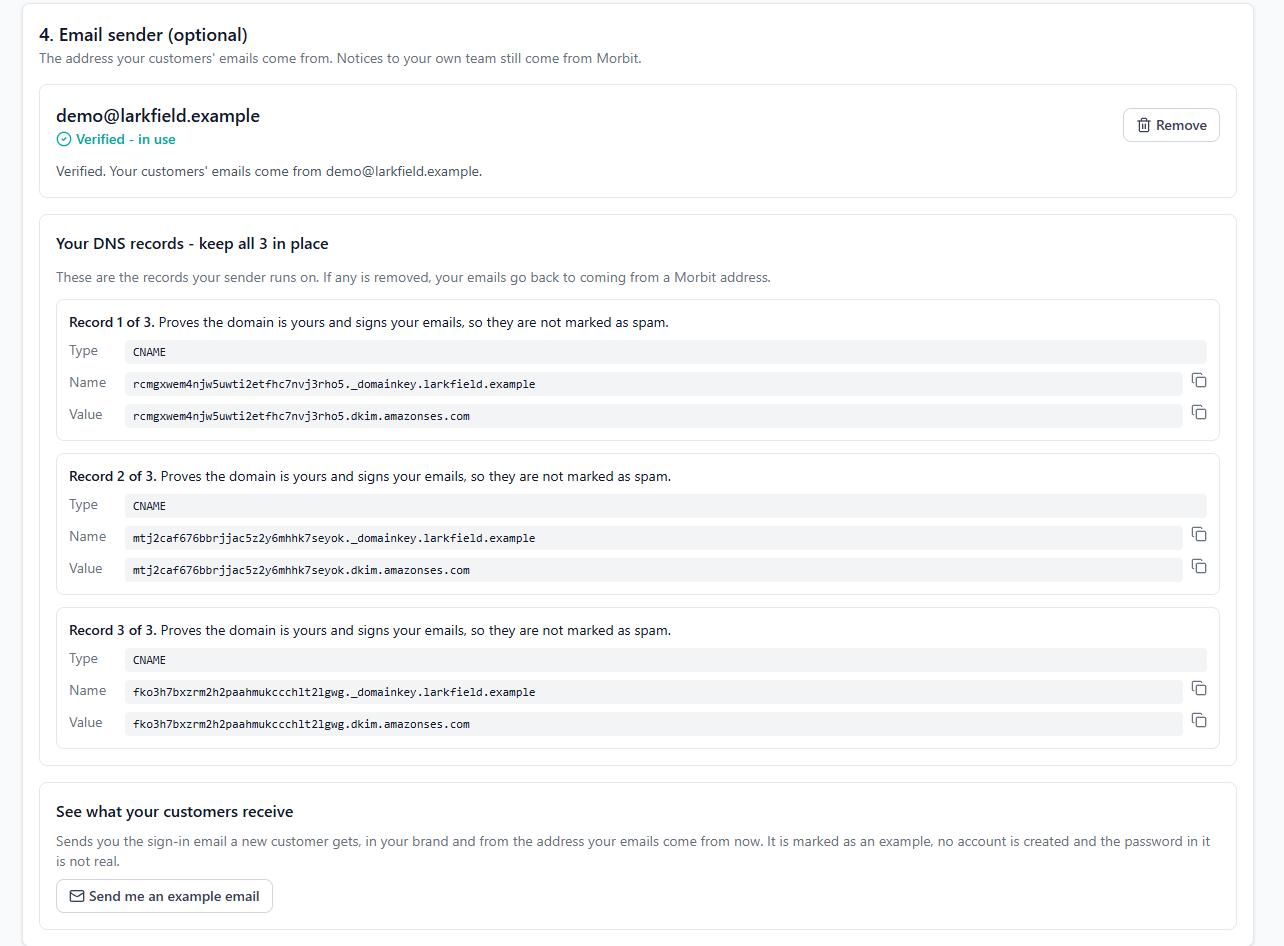
- The page shows three DNS records (CNAME). Add all three at whoever hosts DNS for the domain.
- They are usually found within an hour; until then the status shows Waiting for DNS. When it shows Verified - in use, your customers' emails come from your address.
- Keep all three records in place. If any is removed, your emails go back to coming from a Morbit address.
- The records must be added within 72 hours, and the sender can be changed up to five times in 24 hours.
- Notices to your own team (new accounts, the daily list) still come from Morbit. Only emails to your customers use your address.
- Remove sends your customers' emails from the Morbit address again straight away.
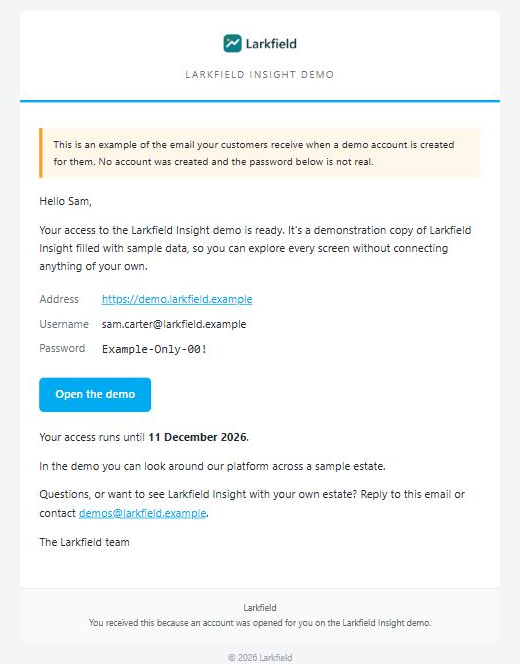
See what your customers receive. At the bottom of this step, Send me an example email sends you the sign-in email a new customer gets, in your brand and from the address your emails come from at that moment - so you can check it before and after setting a sender. It is marked as an example, no account is created and the password in it is not real. It needs steps 1 to 3 finished.
Your sign-up page
Once your address is live, you also have a public sign-up page in your brand at:
https://your-demo-address/request-access
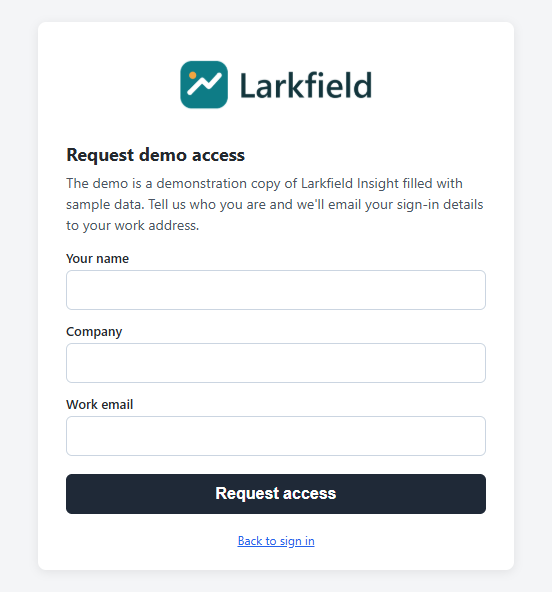
It is linked from your demo's sign-in page, and you can link to it from your own website. A visitor enters their name, company and work email, and is emailed sign-in details for 30 days of access.
- Only business email addresses are accepted. Free webmail and disposable addresses are turned away.
- The account appears in your Demo Users list with the source Your sign-up page, and your team is emailed that it was created.
- Someone who asks again while their account is active is sent a reminder, not a new password. Someone whose access has ended is asked to contact you.
Users: who in your team can sign in
For partner admins.
Only the people on this list can sign in for your organisation.
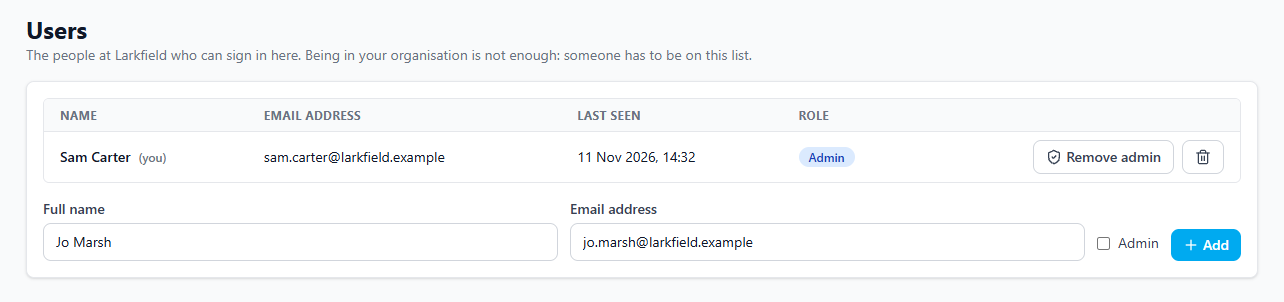
- Add a person - enter their name and their email address exactly as they sign in to Microsoft 365 (their sign-in name, which is not always the address they receive mail at). Tick Admin if they should manage white-labelling, users and notifications.
- Make admin / Remove admin - changes what an existing person can do.
- Remove - the person can no longer sign in. Do this when someone leaves.
Your organisation always needs at least one admin: to remove the last one, make someone else an admin first.
A newly added person can sign in straight away. A person who was refused a moment before being added may need to wait a minute and try again.
Notifications
For partner admins.
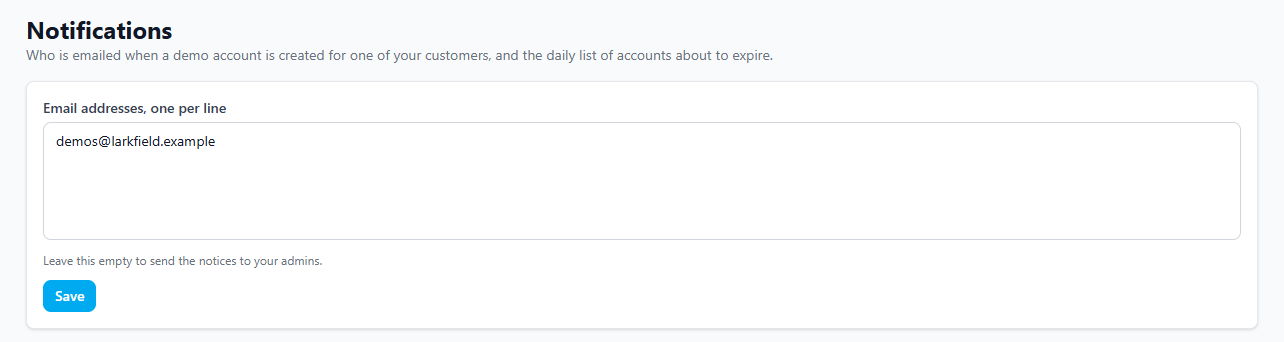
Your team is emailed when a demo account is created for one of your customers - whether by your team or through your sign-up page - and receives a daily list of accounts about to expire, on days when there are any.
Enter the email addresses that should receive these, one per line, up to ten. A shared mailbox works well. Leave the box empty and the notices go to your admins. Replies from customers to your branded emails go to the same addresses.
What your customers see
| With white-labelling | Without white-labelling | |
|---|---|---|
| Where they sign in | Your own demo address, and only there | https://demo.morbit.co.uk |
| Brand on the demo | Your names and logos | Morbit's |
| Emails | Your logo, names and contact details; from your own address if you set one up | Morbit's |
| Self-service sign-up page | Yes, on your address | No - your team creates each account |
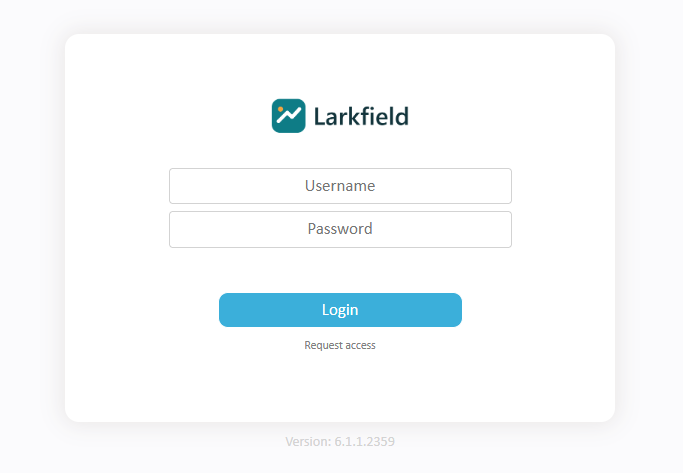
With white-labelling, this is the sign-in page your customers see:
The emails a customer can receive:
- Their sign-in details, when the account is created.
- A new password, when you reset it.
- A reminder five days before their access ends.
- Their new end date, when you extend the account or make it permanent.
Your customers are not added to any Morbit mailing list.
If something does not work
| What you see | What to check |
|---|---|
| I cannot sign in to the portal | Has your IT administrator opened the approval link? Has one of your admins added you on the Users page, with your exact Microsoft sign-in name? Did you sign in with multi-factor authentication? |
| I do not see White-label, Users or Notifications | Users and Notifications are for admins - ask one of yours to make you an admin. White-label also needs Morbit to have switched it on for your organisation. |
| "New Demo User" is not available, or the page says the demo is not ready | Your white-label set-up is incomplete. Ask an admin to open the White-label page: the box at the top says which step is missing. |
| A customer says they cannot sign in | Open their account. Locked: reset the password. Disabled: extend or re-enable it. Check too that they are using your demo address - a white-label account does not work on any other address. |
| A customer did not receive their email | Ask them to check junk mail. Then open the account's history, which shows whether the email was sent. Resetting the password sends a fresh one. |
| "A demo account for this email already exists" | Each email address can have one demo account. If it is in your list, reset its password or extend it instead. If it is not in your list, contact Morbit. |
| A logo is refused | It must be the exact size in the table above, the right file type, and under 1 MB. Resize it exactly; do not just crop or scale roughly. |
| The demo address stays on "add the DNS records" | Check both records exist, exactly as shown, with any proxy option off. Some DNS providers add your domain to the name automatically - if the record ends up as name.yourcompany.com.yourcompany.com, enter the name without the domain part. DNS changes can take up to an hour to be seen. |
| The demo address says it could not be set up | The page gives the reason. Usually the records were not added within 72 hours, or your domain has a CAA record that does not allow Amazon to issue certificates. Fix the cause and set the address again. |
| Emails still come from maia@morbit.co.uk | The email sender (step 4) is not verified yet. Check all three records are in place. |
Getting help
Contact your Morbit account manager, or email sales@morbit.co.uk. It helps to include your organisation's name, the page you were on and the exact message shown.
Morbit can also do the following for you, which are not available in the portal: switch white-labelling on or off, change your first admin, and suspend or reinstate your organisation's access.
Was this article helpful?
That’s Great!
Thank you for your feedback
Sorry! We couldn't be helpful
Thank you for your feedback
Feedback sent
We appreciate your effort and will try to fix the article